
 Save
Save
This soft sourdough sandwich bread is the kind of recipe that fits into real life. It takes its time but rewards you with pillowy loaves that are perfect for everyday slicing and toasting. With no kneading and a forgiving schedule, it is a solid option even if you are new to baking with sourdough.
I started baking this when my starter was young and unpredictable and it still came out great. Now it is the bread I make when I want guaranteed success without hovering in the kitchen.
Ingredients
- Active sourdough starter: provides natural leavening and a subtle tang
- All purpose or bread flour: supports a soft yet structured crumb
- Milk or buttermilk: enriches the dough and improves tenderness
- Fat like butter or oil: helps keep the bread soft for days
- Sweetener: adds a touch of flavor and balances the sourdough
- Salt: is essential for flavor and proper dough fermentation
Choose quality flour with good protein content and use whole milk or cultured buttermilk for the best texture
Step-by-Step Instructions
- Feed the Starter:
- Combine half a cup of sourdough starter with two cups of flour and one and one third cups of warm water. Stir until blended and let sit covered at room temperature for four to six hours. You are aiming for a bubbly active mixture that smells slightly sweet.
- Prepare the Pre-ferment:
- In a large mixing bowl stir together two cups of milk or buttermilk two cups of the active sourdough starter and three cups of flour. Mix gently on low speed for about one minute until just combined. Cover the bowl and leave it on the counter overnight to ferment slowly.
- Mix the Dough:
- In the morning add a quarter cup of your chosen fat half a cup of sweetener four teaspoons of salt and three more cups of milk or buttermilk to the bowl. Stir gently then begin mixing in five cups of flour. Mix on medium speed for five to ten minutes until the dough becomes elastic. Slowly add four to six more cups of flour a little at a time until the dough pulls away from the sides of the bowl but still feels slightly tacky. Mix a final two to three minutes to finish developing the dough.
- First Rise:
- Transfer the dough into a greased large bowl. Cover it loosely and set it in a warm area for two to three hours or until it doubles in size. It should look airy and feel light when pressed gently.
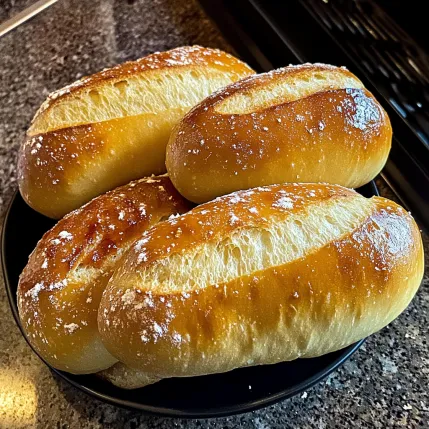
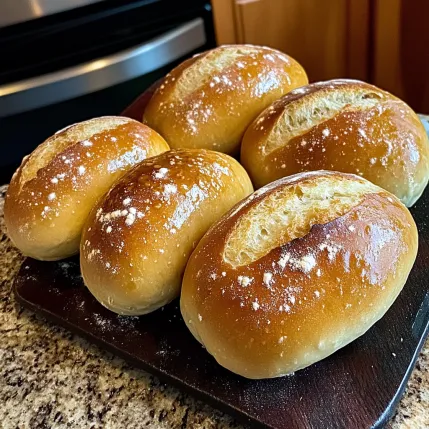
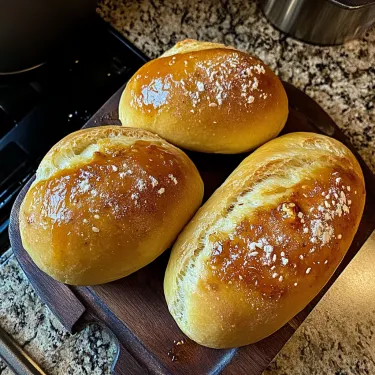
- Shape the Loaves:
- Punch down the dough and place it on a lightly floured work surface. Divide into four even portions. Take each portion and flatten it slightly into a rectangle. Fold in the corners then roll tightly into a loaf shape. Set each loaf seam side down into a greased loaf pan.
- Second Rise:
- Cover the pans and let them rise again for two to three hours until the dough crowns just above the edge. Be sure not to let them over proof or they may collapse during baking.
- Bake:
- Preheat the oven to three hundred seventy five degrees Fahrenheit or one hundred ninety degrees Celsius. Use a sharp knife or bread lame to make a shallow cut across the top of each loaf. Place in the oven and bake for thirty minutes until golden brown and the internal temperature reads one hundred ninety degrees Fahrenheit.
- Cool and Serve:
- Carefully remove the hot loaves from their pans and place them on a wire rack. For a softer crust brush the tops with melted butter while still warm. Let them cool completely before slicing to prevent a gummy texture.
 Save
Save
Storage Tips
Once the loaves are fully cooled store them in a bread bag or tightly wrapped at room temperature for up to three days. For longer storage freeze whole or sliced loaves in freezer safe bags. Toasting brings frozen slices right back to life.
 Save
Save
Ingredient Substitutions
You can use oil in place of butter for a dairy free version. Honey adds flavor depth but granulated sugar works just fine. Buttermilk gives a pleasant tang but milk will also yield great results.
Serving Suggestions
This bread is made for sandwiches from grilled cheese to turkey club. It also pairs well with soups or as thick slices topped with jam or butter. If you have extra try cubing and toasting for croutons or making French toast.
Cultural Context
Sourdough baking has deep roots across many traditions but this enriched variation is popular in American home kitchens. It bridges the rustic tang of fermented dough with the softness of classic sandwich bread offering the best of both worlds.
Common Recipe Questions
- → Can I use only all-purpose flour?
Yes, all-purpose flour works well and produces a tender crumb. Bread flour can be used for extra chewiness.
- → Is kneading necessary?
No kneading is required. The long resting and mixing times develop enough gluten for structure and rise.
- → Can I use discard sourdough starter?
Active starter is recommended for rising. Discard won’t provide enough fermentation strength for this dough.
- → How do I know when it’s fully proofed?
The dough should rise just above the pan rim. Over-proofing may cause deflation during baking.
- → How should I store leftover bread?
Store cooled bread in a sealed bag at room temperature for up to 3 days or freeze for longer freshness.
- → Can I make smaller loaves or rolls?
Yes, divide the dough into smaller portions and adjust baking times accordingly until golden and cooked through.