
 Save
Save
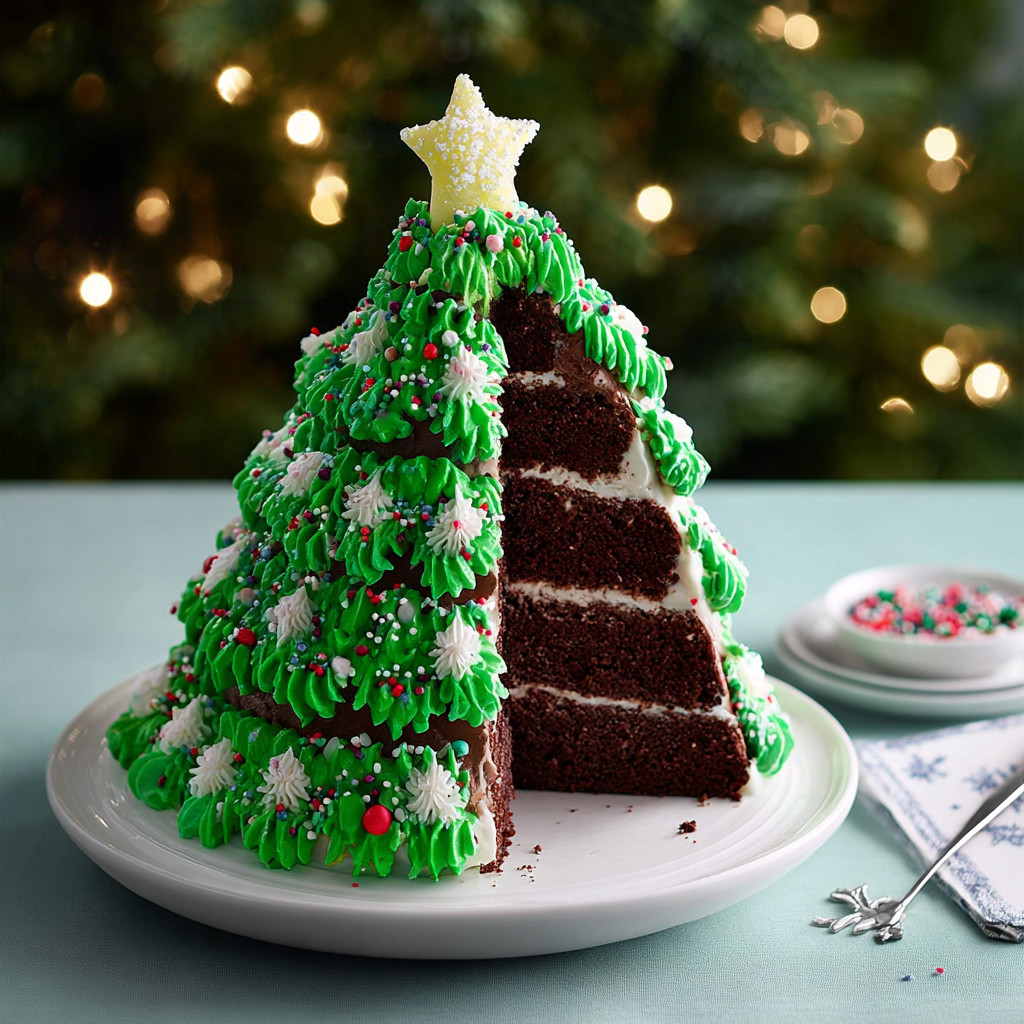
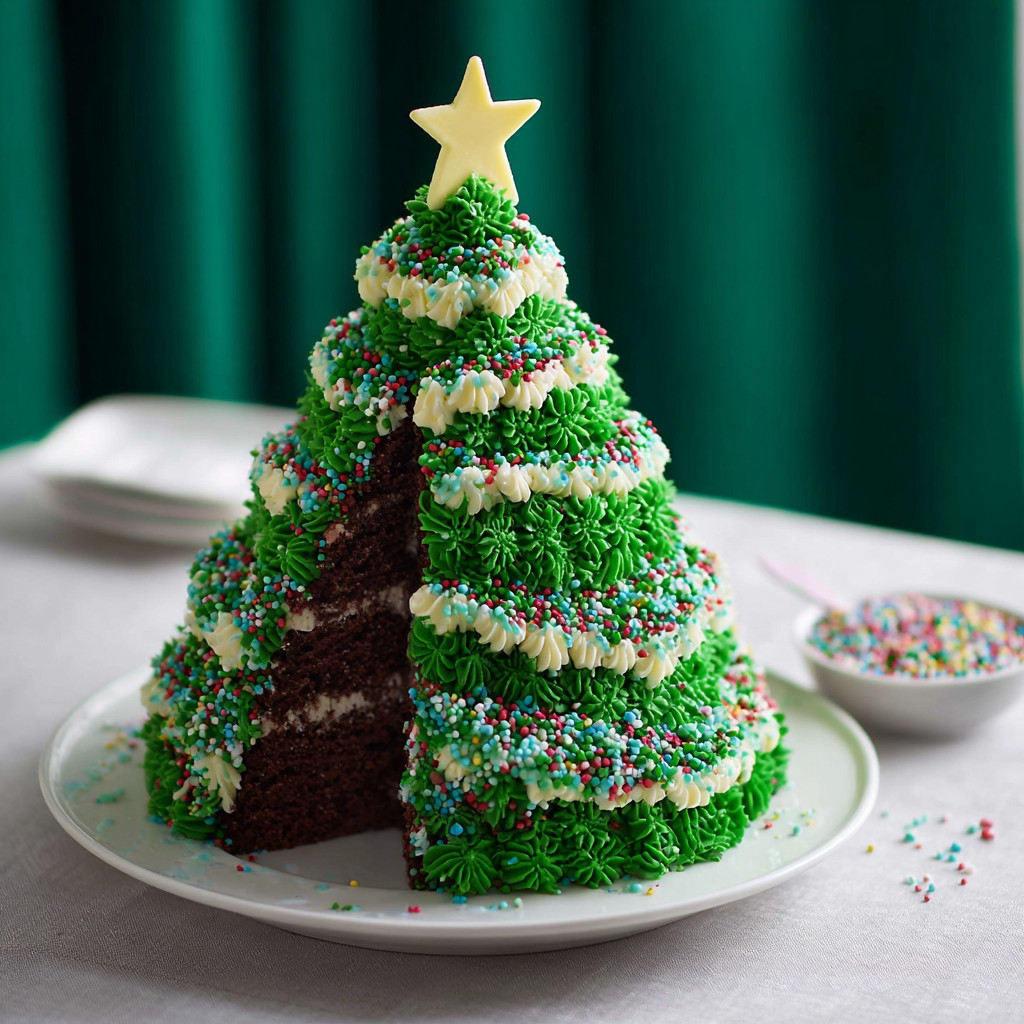
This Christmas Tree Cake is a showstopper perfect for the holiday season when you want to impress your guests with a stunning centerpiece. It features nine layers stacked carefully to create a beautiful tree shape covered with shades of green frosting that look like lush pine needles. The process requires some patience but every step is manageable, especially if you work with chilled cake layers which are much easier to handle and frost. Whether you use a boxed mix or your favorite homemade cake recipe, this cake will bring smiles and festive joy to your table.
I first made this cake on a chilly December afternoon and loved how each layer came together like building blocks of a snowy forest. My family couldn’t stop taking photos before digging in.
Ingredients
- Cooking spray: for preparing your pans and ensuring the cakes lift out cleanly
- Chocolate cake mix: Two 15.25-ounce boxes of chocolate cake mix or your preferred cake recipe for a rich and moist base
- Softened butter: Two and a half cups (five sticks) of softened butter to create a smooth frosting texture
- Powdered sugar: Eight cups of powdered sugar to sweeten and thicken the buttercream
- Heavy cream: Two tablespoons heavy cream add creaminess and help reach the perfect frosting consistency
- Pure vanilla extract: One tablespoon pure vanilla extract for a warm, complementary flavor
- Kosher salt: One-quarter teaspoon kosher salt to balance the sweetness in the frosting
- Green food coloring: to create a range of vibrant greens for frosting the tree
- Sprinkles: to mimic ornaments and add a festive touch
Step-by-Step Instructions
- Sauté the Aromatics:
- Not applicable for this recipe
- Preheat and Prepare the Cake Pans:
- Set your oven to 350 degrees Fahrenheit. Grease and line five 8-inch round cake pans with parchment paper to prevent sticking.
- Mix and Bake the Cake Layers:
- Follow the package directions to prepare the cake batter. Divide the batter evenly among the prepared round pans. Bake for 20 to 23 minutes or until a toothpick inserted in the center comes out clean. Remove from oven and let cakes cool for 15 minutes in the pans before turning them out onto cooling racks to cool fully.
- Wrap and Chill the Cake Layers:
- Once completely cooled, wrap each cake layer tightly in plastic wrap and freeze for at least 30 minutes up to three days. Chilling solidifies the cake, making it easier to trim and stack.
- Prepare the Buttercream Frosting:
- In a large bowl, beat the softened butter with a mixer until no lumps remain and the texture is smooth. Gradually add powdered sugar on low speed until fully incorporated. Add heavy cream, vanilla extract, and salt. Beat on medium until the frosting is smooth and spreadable. If too thick, add more cream one tablespoon at a time until you reach the desired consistency.
- Level the Cake Layers:
- Remove the cake from the freezer. Using a long serrated knife, trim the cakes to achieve flat tops for easier stacking.
- Cut and Stack the Cake Layers:
- Using round cake cutters, cut a 7-inch circle from one cake layer and place it on your cake stand or plate. Spread a thin layer of frosting on top. Continue with 6-inch, 5-inch, and 4-inch circles stacked with frosting between each layer.
- Create the Top of the Tree:
- Cut the fifth cake layer into smaller circles sized 3 inches, 2.5 inches, 2 inches, 1.5 inches, and 1 inch. Stack these small circles on top of the larger layers with frosting in between each to form the tree tip.
- Apply the Crumb Coat and Chill:
- Put about one third of the remaining frosting into a piping bag with a large round tip and pipe around the cake. Smooth the frosting with an offset spatula shaping it into a cone resembling a tree. Refrigerate the cake for thirty minutes to set the crumb coat and stabilize the layers.
- Prepare the Green Frosting Colors:
- Divide the remaining frosting equally into three bowls. Tint one bowl light green, the second with a medium green shade, and the third dark green.
- Pipe the Pine Needles:
- Fill a piping bag fitted with an open star tip by placing the three shades of green side by side into the bag. Starting at the cake base, pipe frosting in short bursts pulling away slightly for a natural needle effect. Rotate the bag occasionally so the colors swirl and blend creating depth.
- Decorate with Sprinkles:
- Add your favorite sprinkles that look like Christmas ornaments all over the tree. You can even dust the finished cake lightly with powdered sugar to mimic snow for the perfect festive touch.
 Save
Save
My favorite ingredient is the heavy cream because it makes the buttercream frosting beautifully light and easy to spread. The first time I assembled this cake I had to steady the top tiers carefully until the frosting set but seeing the final tree took all the effort away.
Storage Tips
Store this cake in the refrigerator covered loosely with a cake dome or plastic wrap to keep it moist without squashing the frosting. Remove from the fridge at least 30 minutes before serving to bring the frosting to a creamy texture. Leftover cake can be wrapped tightly and frozen for up to a month.
Ingredient Substitutions
Feel free to swap the boxed chocolate cake mix for any homemade cake recipe you prefer or pick a festive spice cake for extra holiday flavor. Use vegan butter and plant-based milk in frosting for dairy-free versions. If you don’t have heavy cream, whole milk plus a little melted butter can work in a pinch.
Serving Suggestions
Serve slices with a drizzle of warm caramel sauce or a scoop of vanilla ice cream to balance the rich chocolate and sweet frosting. Pair this showy cake with peppermint hot cocoa or mulled wine for a cozy holiday dessert experience.
Pro Tips
- Work with cold cake layers they’re much less crumbly and easier to trim
- Do not skip chilling the crumb coat it helps stabilize the layered tree for decorating
- Use a spinning cake stand if you have one it makes frosting and piping much smoother and faster
Common Recipe Questions
- → How do I keep the cake layers stable while stacking?
Chill the cake layers well before stacking to make them firmer and easier to handle. Applying a crumb coat and refrigerating again will help secure the layers and reduce wobbling.
- → What is the best way to achieve smooth, even frosting?
Use an offset spatula and pipe the frosting in layers, smoothing carefully between applications. A spinning cake stand can help maintain an even surface.
- → How can I make the green frosting look natural and dimensional?
Divide the frosting into three shades of green and fit them side-by-side in a piping bag fitted with a star tip. Pipe while rotating the bag to blend the colors and create texture.
- → Can I use a homemade cake instead of a boxed mix?
Yes, a homemade cake can be easier to handle and frost, but a boxed mix offers convenience. Choose whichever you prefer based on your time and taste preferences.
- → How do I decorate the cake to resemble a Christmas tree?
Use sprinkles to mimic ornaments and dust powdered sugar lightly over the frosting to create a snow effect. This adds a festive, visually appealing finish.
- → What tools help with frosting a tall, layered cake?
A cake stand that spins greatly simplifies frosting, as does using a piping bag with tips and an offset spatula. These tools help manage smooth application and detail.