
 Save
Save
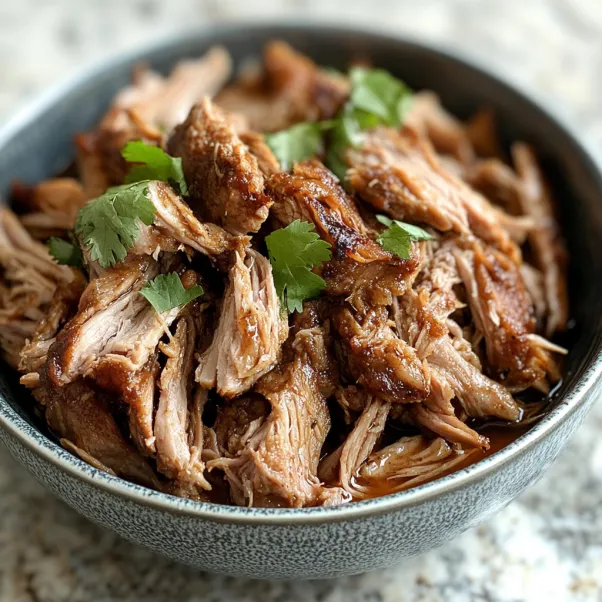
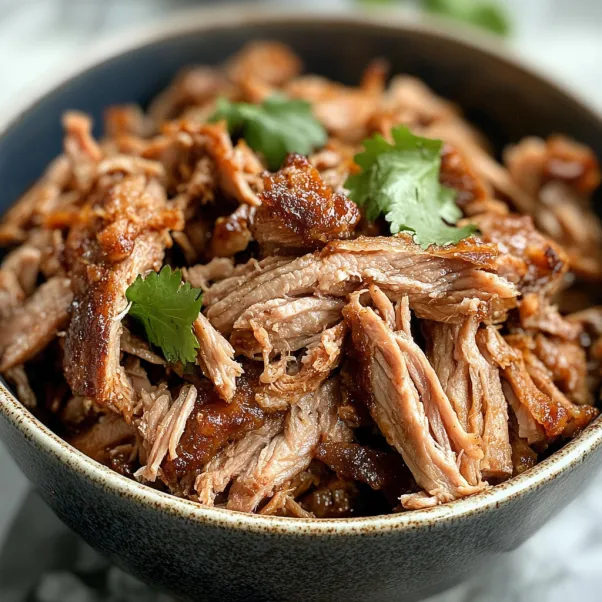
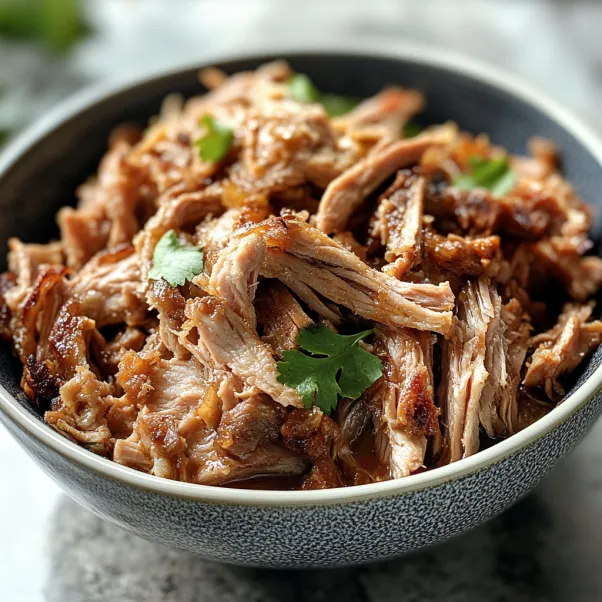
This hearty Crockpot Pork Carnitas recipe has become my secret weapon for feeding a crowd with minimal effort. The slow cooker transforms an ordinary pork shoulder into succulent, flavor-packed meat that's versatile enough for multiple meals throughout the week.
I first made these carnitas for a neighborhood potluck three years ago and came home with an empty crockpot and multiple recipe requests. Now it's in my regular rotation whenever I need to feed my busy family for several days with one cooking session.
Ingredients
- 3-4 lbs boneless pork shoulder this cut has ideal fat marbling for juicy carnitas that won't dry out during long cooking
- 1 tbsp olive oil helps create a flavorful sear on the pork before slow cooking
- 1 cup orange juice provides natural sweetness and tenderizes the meat
- ½ cup lime juice adds brightness that balances the rich pork
- ½ cup chicken broth creates steam for moist cooking environment
- 1 small onion forms a flavorful base that melts into the sauce
- 3 cloves garlic infuses the meat with aromatic flavor
- 1 tbsp chili powder adds mild heat and depth without overwhelming spiciness
- 2 tsp ground cumin contributes warm earthy notes essential for authentic flavor
- 1 tsp smoked paprika brings subtle smokiness that mimics traditional outdoor cooking
- 1 tsp oregano adds herbal notes that complement the citrus
- 1 tsp salt enhances all other flavors
- ½ tsp black pepper provides subtle background heat
- ½ tsp ground cinnamon adds unexpected warmth and complexity
- 1 bay leaf contributes subtle aromatic qualities during slow cooking
Step-by-Step Instructions
- Prepare the Pork
- Pat the pork shoulder completely dry with paper towels to ensure proper browning. Mix all the dry spices together in a small bowl for even distribution. Massage the spice mixture thoroughly into every surface of the meat, pressing gently to adhere. Make sure no area is left unspiced for maximum flavor development.
- Sear for Extra Flavor
- Heat olive oil in a large skillet until it shimmers but doesn't smoke. Carefully place the seasoned pork in the hot pan, allowing it to develop a deep golden crust for 2-3 minutes before turning. Sear all sides patiently, as this browning creates rich flavor compounds that will infuse throughout during slow cooking.
- Layer the Crockpot
- Create a flavorful bed by spreading diced onions and minced garlic across the bottom of your crockpot. This vegetable layer prevents the meat from sticking while infusing it with aromatic flavors. Position the seared pork on top of this bed. Combine and pour all liquid ingredients around the sides of the meat rather than over top to preserve the spice crust. Tuck the bay leaf alongside the roast.
- Slow Cook
- Secure the lid tightly and set your crockpot to low for 8-10 hours if possible. This gentle, extended cooking breaks down tough connective tissue while preserving moisture. Resist the urge to peek or stir during cooking as each lid removal extends cooking time by 20-30 minutes.
- Shred the Pork
- Transfer the tender pork to a large cutting board, leaving the cooking liquid behind. Using two forks, pull the meat apart along its natural grain lines until completely shredded. Remove any remaining fat pockets you encounter. The meat should pull apart with minimal resistance, a sign of perfect doneness.
- Crisp Up the Carnitas
- Heat a large cast iron or nonstick skillet over medium-high heat until hot. Work in batches, adding just enough shredded pork to cover the bottom in a single layer. Let it cook undisturbed for 1-2 minutes until the bottom develops crispy edges, then gently stir to expose more surfaces to the heat. Continue for another 2-3 minutes until you have a perfect balance of crispy bits and tender meat.
- Serve and Store
- Serve immediately on a large platter for family-style meals or portion into serving dishes for tacos, bowls, or other preparations. For storage, cool completely before transferring to airtight containers. Refrigerate with some of the cooking liquid to keep the meat moist during storage.
 Save
Save
The fresh citrus juice is truly the secret ingredient that transforms this dish. I learned this technique from my neighbor whose family comes from Michoacán, Mexico, where carnitas originated. She taught me that commercial bottled juices simply cannot replicate the brightness of fresh citrus, which both tenderizes the meat and balances the rich flavors.
Mastering the Crispy Finish
While technically optional, the final crisping step is what elevates homemade carnitas to restaurant quality. After slow cooking, the meat is tender but lacks the textural contrast that makes authentic carnitas so craveable. When crisping in a hot pan, leave the meat undisturbed at first to develop those caramelized edges. For extra flavor, spoon a few tablespoons of the cooking liquid over the meat while it crisps, allowing it to reduce and intensify. This creates carnitas with the perfect balance of crispy exterior and juicy interior.
Easy Substitutions
This recipe remains delicious even with some adjustments. If pork shoulder isn't available, pork butt works perfectly as an alternative since both cuts have similar fat content and texture. For a lighter version, pork loin can work but will require less cooking time and yields slightly drier results. The citrus components are flexible too. No fresh oranges? Substitute with two teaspoons of orange zest mixed with apple juice. For a non-alcoholic substitute to deepen flavors, add two tablespoons of worcestershire sauce instead of the traditional cooking wine some recipes call for.
Make-Ahead and Freezing
These carnitas actually improve with time, making them perfect for meal planning. You can complete all steps through shredding up to three days before serving, storing the meat in its cooking liquid in the refrigerator. When ready to serve, simply reheat and crisp as directed. For longer storage, portion cooled carnitas into freezer bags, adding a few tablespoons of cooking liquid to each before removing excess air and sealing. Freeze flat for quick thawing for up to three months. Thaw overnight in the refrigerator before reheating in a skillet with a splash of water to restore moisture.
 Save
Save
Common Recipe Questions
- → Can I make pork carnitas without a slow cooker?
Yes! You can make carnitas in a Dutch oven by following the same preparation steps, then cooking covered in a 325°F oven for about 3-4 hours until the meat is fork-tender. For a pressure cooker or Instant Pot, cook on high pressure for about 45-60 minutes with a natural release.
- → Is the final crisping step really necessary?
While technically optional, the final step of crisping the shredded pork in a hot skillet creates those signature caramelized edges that give authentic carnitas their magical texture contrast. It only takes 3-5 minutes and significantly enhances the eating experience.
- → What's the best cut of pork for carnitas?
Boneless pork shoulder (also called pork butt or Boston butt) is ideal because it has the perfect amount of fat marbling that renders during slow cooking, creating tender, juicy meat. Leaner cuts like pork loin won't produce the same fall-apart texture.
- → Can I freeze leftover carnitas?
Absolutely! Carnitas freeze exceptionally well. Cool completely, then store in airtight containers or freezer bags for up to 3 months. To reheat, thaw overnight in the refrigerator and warm in a skillet with a little oil to restore some crispiness.
- → What can I use instead of orange juice?
If you don't have orange juice, you can substitute with a mixture of chicken broth and 1-2 tablespoons of apple cider vinegar plus 1 tablespoon of honey or brown sugar to mimic the sweet-acidic balance. Pineapple juice also works well as a substitute.
- → How do I know when the pork is done cooking?
The pork is done when it easily shreds with a fork and reaches an internal temperature of at least 195°F. At this temperature, the tough connective tissues have broken down, resulting in tender meat. If it's still tough, continue cooking for another 30-60 minutes.